Complete gids voor champignonteelt in India en marktkansen
Overzicht van paddenstoelen en wereldwijde trend
* Sommige secties in dit artikel zijn te lang. Gebruik alstublieft de inhoudsopgave bovenaan het artikel om naar het gedeelte van uw interesse te springen.
Champignonteelt/teelt begonnen als hobby, het is echter een volwaardige, zeer winstgevend beroep/ agribusiness . De meeste soorten paddenstoelen kunnen worden gekweekt/gekweekt in kamers, schuren, garages, kelders en kleine magazijnen.
De commerciële champignonteelt werd eind jaren zestig in India geïntroduceerd, toen een Duitse landbouwer samenwerkte met een Indiase landbouwer in Solan, een stad in de Indiase deelstaat Himachal Pradesh, onder een regeling genaamd "Ontwikkeling van de champignonteelt in Himachal Pradesh".
Dit artikel is gericht op het geven van informatie over paddenstoelensoorten, wereldwijde en lokale paddenstoelenmarkt, wereldwijde en lokale champignonproductie samen met productieaandeel, technieken van de champignonteelt in India, een aantal van de ziekten die verband houden met gekweekte/gekweekte paddenstoelen en variëteiten van paddenstoelen die lokaal voor commerciële doeleinden kunnen worden gekweekt. Gelieve te verwijzen naar de inhoudsopgave sectie om direct naar het onderwerp van uw interesse te gaan.
Ondernemers hebben de champignonteelt op grote schaal opgepakt. Het bericht heeft mensen bereikt dat paddenstoelen een nationale en internationale markt hebben.R N Verma, Directeur van het National Center for Mushroom Research and Training -NCMRT
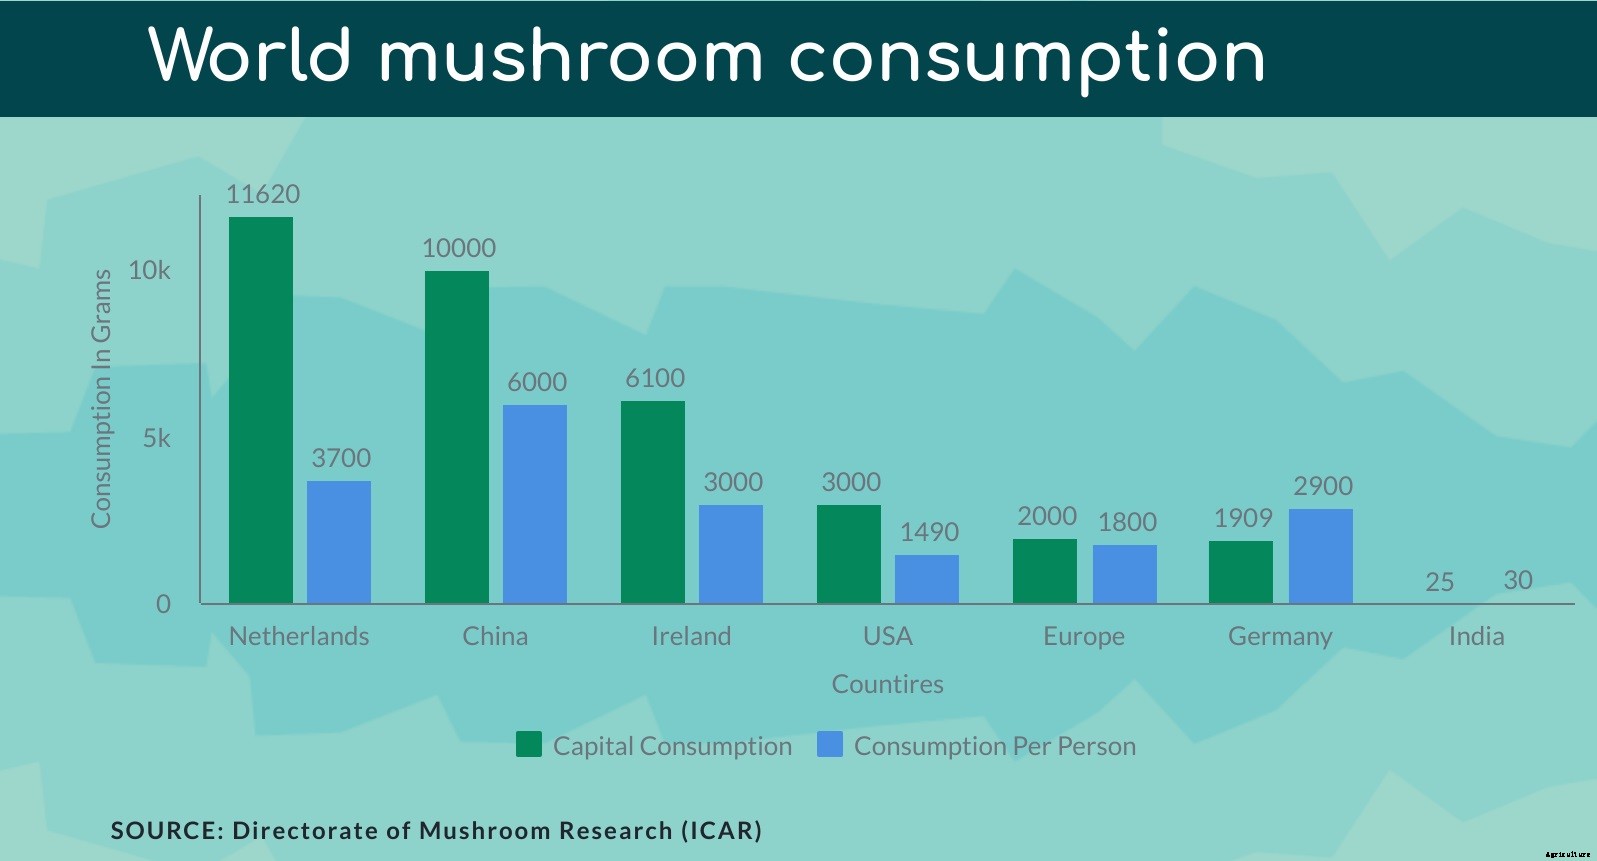
Wereldchampignonconsumptie in vergelijking met India
De champignonconsumptie in India is erg laag in vergelijking met veel champignonconsumerende landen.
Sinds, de trend van de champignonconsumptie heeft een zeer langzame groei gezien in India, champignonteelt heeft de wereldwijde trend niet ingehaald.
Momenteel, De consumptie van champignons in India wordt geschat op ongeveer 30-40 g, vergeleken met 2-3 kg in de Verenigde Staten en Europa. India consumeert ongeveer 90 gram paddenstoelen per persoon, een relatief lage hoeveelheid in vergelijking met andere landen, inclusief de VS met 1,49 kilogram en China met 1,16 kilogram.
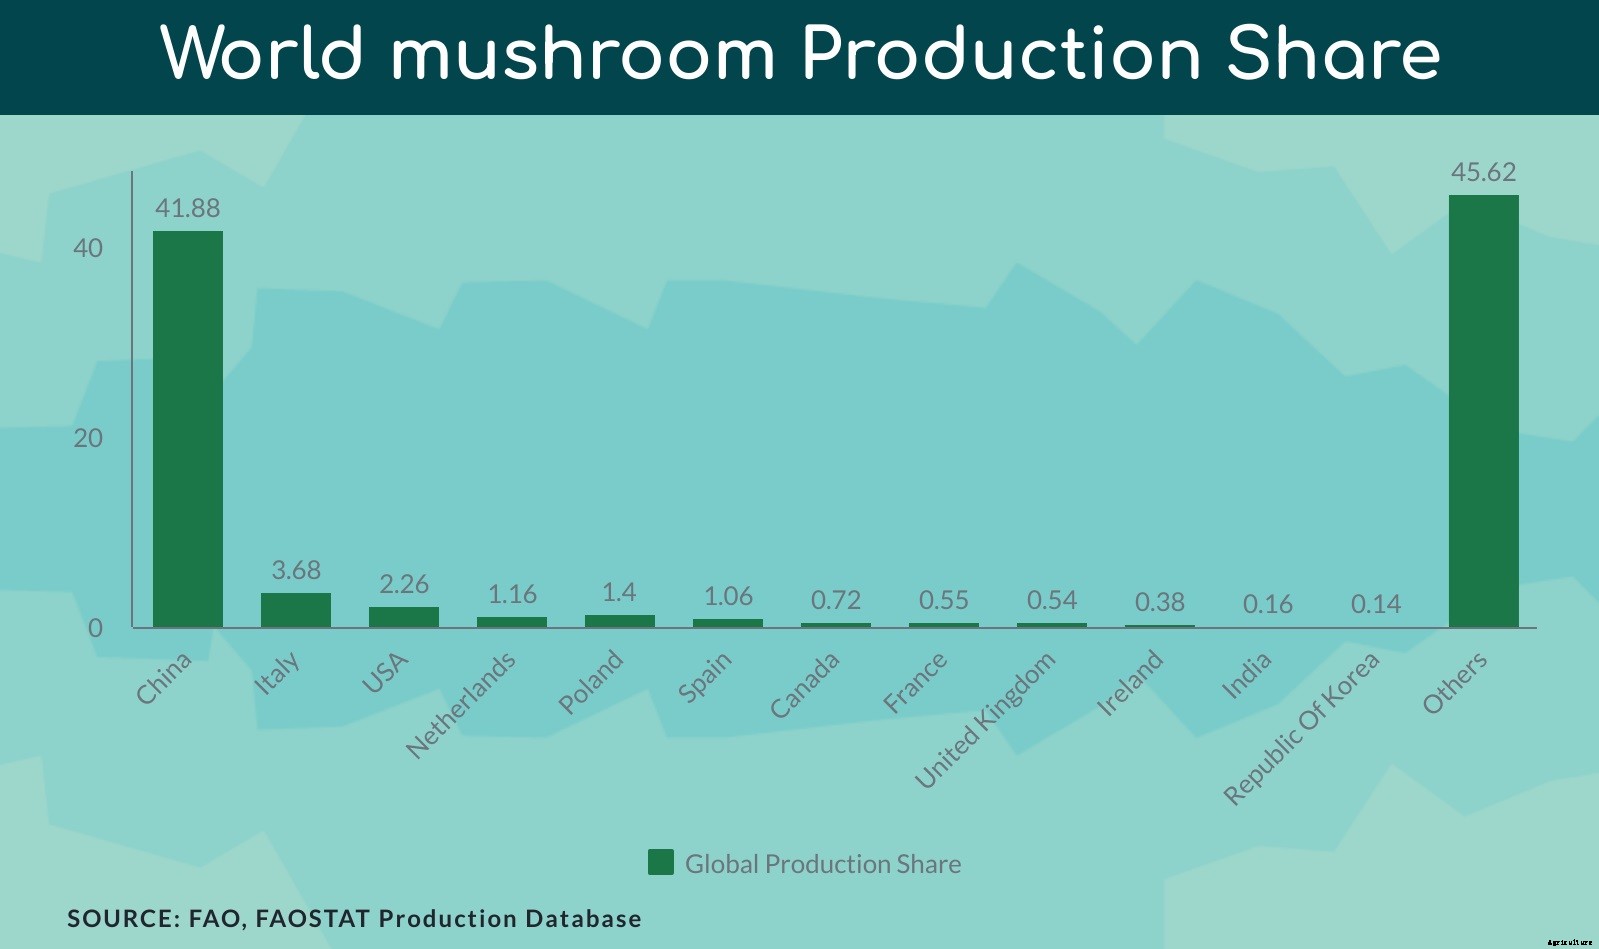
Wereldwijde productie en marktaandeel van champignons
De paddenstoelenmarkt had in 2015 een wereldwijde waarde van $ 35 miljard. In de periode tussen 2016 en 2021, de markt zal naar verwachting met 9,2 procent groeien. Als resultaat, tegen 2021, de markt zal naar verwachting bijna $ 60 miljard bereiken. Toonaangevende producenten van champignons zijn onder meer China, de Verenigde Staten, Nederland, Polen, Spanje, Frankrijk, Italië, Ierland, Canada en het Verenigd Koninkrijk.
Land
2010
2011
2012
2013
2014
2015
2016
China
48, 26, 000
56, 58, 972
65, 27, 965
70, 68, 102
75, 91, 140
80, 26, 152
77, 86, 368
Italië
6, 84, 401
7, 61, 858
10, 16, 886
6, 04, 525
6, 00, 114
5, 94, 835
6, 83, 620
VS
3, 59, 469
3, 90, 902
4, 02, 904
4, 08, 157
4, 32, 100
4, 29, 562
4, 19, 630
Nederland
2, 66, 000
3, 04, 000
3, 07, 000
3, 23, 000
3, 10, 000
3, 10, 000
3, 00, 000
Polen
2, 30, 000
2, 20, 000
2, 28, 300
2, 37, 069
2, 45, 747
2, 52, 944
2, 60, 140
Spanje
1, 33, 000
1, 46, 100
1, 47, 440
1, 49, 700
1, 49, 854
2, 18, 795
1, 97, 010
Canada
78, 452
84, 202
1, 37, 597
1, 32, 448
1, 34, 545
1, 18, 642
1, 33, 935
Frankrijk
1, 19, 373
1, 15, 696
1, 16, 602
1, 04, 461
1, 08, 671
1, 01, 135
1, 01, 949
Verenigd Koninkrijk
69, 300
70, 740
78, 580
85, 484
94, 857
1, 03, 197
99, 813
Ierland
54, 500
57, 700
69, 600
67, 700
69, 600
72, 200
70, 000
India
40, 600
40, 600
30, 000
17, 000
28, 000
33, 699
29, 992
Republiek Korea
26, 250
24, 787
26, 000
26, 771
26, 860
26, 292
26, 158
Alle andere
53, 69, 166
62, 27, 659
70, 94, 714
76, 65, 730
82, 16, 306
86, 59, 997
84, 80, 171
Totale productie
1, 22, 56, 511
1, 41, 03, 216
1, 61, 83, 588
1, 68, 90, 147
1, 80, 07, 794
1, 89, 47, 450
1, 85, 88, 786
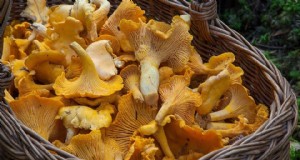
Tot de belangrijkste paddenstoelenproducten behoren shiitake, knop, oester, en andere producten die padie bevatten, melkachtige paddestoel, reishi paddestoel, en winterpaddestoelen, Morchella-soorten en Tuber magatum.
Ondanks dat, de Aziatische landen zullen naar verwachting het meest groeien in de productie van champignons, India groeit nog steeds in de champignonteelt met een vrij traag tempo van 4,3% per jaar.
India exporteert 105,4 ton witte champignons in ingeblikte en diepgevroren vorm. Onder de champignonproductie in de wereld, De productie van champignons in India draagt 15% bij.
In India werd tussen 2010 en 2017 in totaal ongeveer 0,13 miljoen ton champignons geproduceerd door de champignonteelt. dit nummer ziet er groot uit, maar het lijkt onbeduidend in vergelijking met andere paddenstoelenproducerende landen.
Aangezien de kosten van het kweken van paddenstoelen in het westen hoog oplopen, dit is een uitgelezen kans voor Indiase boeren en ondernemers om serieus na te denken over de champignonteelt in India.
De kosten voor de productie van champignons in het Westen stijgen vanwege de hoge arbeidskosten. Europeanen en Amerikanen kijken steeds vaker naar China en India voor hun paddenstoelen.B L Dhar, Senior wetenschapper (NCMRT)
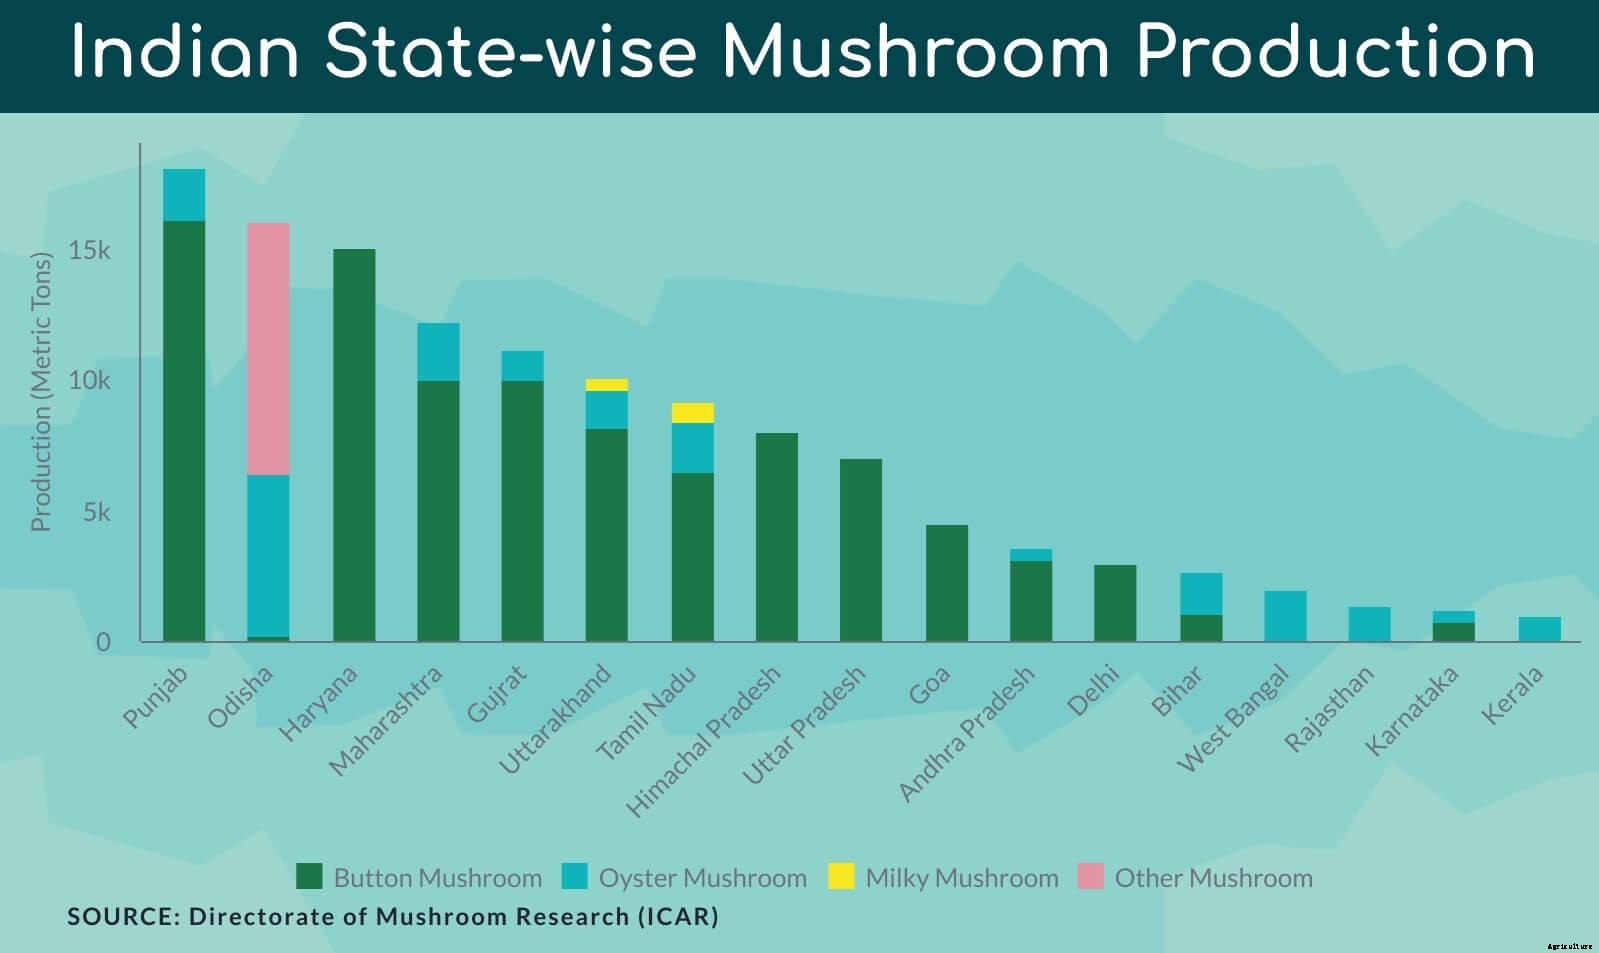
Champignonteelt in India:productie en trend
Agaricus bisporus (champignon met witte knop), Pleurotus spp. (oesterzwam), Volvariella volvacea (paddystro paddestoel), en Calocybe indica - melkachtige paddenstoelen vormen de belangrijkste paddenstoelenrassen die in India worden geteeld.
Pleurotus sajor-caju, Pleurotus flordia, Pleurotus flabellatus, Pleurotus, en Pleurotus Florida zijn de meest geteelde Pleurotus-soorten.
In tropische en subtropische gebieden, oesters, padie stro, en melkpaddenstoelen worden seizoensgebonden gekweekt.
Er wordt ongeveer 73% van de champignons geproduceerd in India en de productiesystemen zijn zowel seizoensgebonden als hightech.
De productie van oesterzwammen is goed voor 16% van de totale productie van champignons en 10, 000 ton per jaar in India wordt geproduceerd. Orissa, Karnataka, Maharashtra, Andhra Pradesh, Madhya Pradesh, West-Bengalen, evenals Meghalaya, Tripura, Manipur, Mizoram, en Assam kweken oesterzwammen in grote hoeveelheden.
De eerste inheemse paddenstoel die in India op de markt wordt gebracht, is de Calocybe indiaca (melkachtige paddenstoel).
traditioneel, de Shiitake-paddenstoel is in India gekweekt op houtblokken, kunstmatige media, maïskolven, zaagsel, tarwezemelen, en andere toevoegingen. De teelt van shiitake-paddenstoelen is verwaarloosbaar en nauwelijks succesvol in India vanwege niet-gestandaardiseerde teeltmethoden.
Voedingswaarde van paddenstoelen
Champignons zijn een uitstekende bron van oplosbare eiwitten en vezels, die een belangrijke rol spelen in de menselijke gezondheid. Als relatief gemakkelijk verteerbaar eiwit (70-90%) paddenstoeleneiwit wordt beschouwd als superieur aan plantaardig eiwit.
Onderstaande tabel geeft de voedingswaarde per 100 gram paddenstoel weer.
PADDESTOELEN
EIWIT
VET
KOOLHYDRAAT
VEZEL
AS
ENERGIE KCAL
Auricularia Auricula
4.20
8.30
82.80
19.80
4.70
351.00
Agaricus Bisporus
33.48
3.10
46.17
20.90
5.70
499.00
Calocybe Indica
17,69
4.10
64.26
3.40
7.43
391,00
Flammulina Velutipes
17.60
1.90
73.10
3.70
7.40
378,00
Lentinula Edodes
32,93
3.73
47,60
28.80
5.20
387,00
Pleurotus Sajor-caju
19.23
2.70
63.40
48.60
6.32
412,00
Pleurotus Ostreatus
30.40
2.20
57,60
8.70
9.80
265,00
Volvariella Volvacea
37,50
2.60
54.80
5.50
1.10
305,00
In India, er zijn verschillende medicinale paddenstoelen, waaronder Ganoderma lucidum, Phellinus rimosus, en Pleurotus spp., die diepgaande geneeskrachtige eigenschappen bezitten.
Zes stappen van champignonteelt
In het volgende gedeelte van het artikel worden de stappen beschreven. Deze stappen zijn in principe verdeeld in twee fasen. Deze stappen omvatten het landbouwproces dat begint vanaf het maken van de compost voor paddenstoelen tot het bijsnijden van paddenstoelen.
Fase l
Stap 1. De compost voorbereiden
voornamelijk, compostbereiding gebeurt buiten. Echter, het kan ook in een afgesloten ruimte met een schuur.
een kade, een structuur van beton wordt gebruikt om de compost te maken.
Stapels compostmateriaal kunnen handmatig worden gemengd of met behulp van een compostomzetter.
Er zijn twee soorten compost:natuurlijke compost (hoofdbestanddeel is paardenmest) en synthetische compost (hooi, gemalen maïskolf, hardhouten schors, katoenzaadschillen, cacaoboonschillen, Banaan pseudo-stam, afval van katoenfabrieken, Waterhyacint, geneutraliseerd druivenpulp, oude versnipperde krant, ureum, calcium, enzovoort.)
Beide soorten compost hebben extra aanvulling van stikstof en gips nodig.
Als de compost wordt gedraaid, het wordt bevochtigd (met water besproeid) voor een goede menging van de compost. In deze stap worden ook stikstofsupplement en gips toegevoegd.
Het bijproduct van dit proces is warmte, kooldioxide en ammoniak. De meest geschikte voedselbron wordt gecreëerd voor paddenstoelen in de compost door chemische reacties en micro-organismen in de compost die warmte afgeven.
voldoende vocht, zuurstof, stikstof en koolhydraten moeten gedurende het hele proces aanwezig zijn, anders stopt de compostering.
Toevoeging van gips brengt veel voordelen met zich mee. Gips helpt de chemicaliën die aan de compost worden toegevoegd om uit te vlokken op de rietjes of het hooi. Het vermindert ook de vettigheid van de compost. Het helpt bij het beluchten van de compost, wat op zijn beurt het risico op de ontwikkeling van chemicaliën minimaliseert die de goede groei van paddenstoelen in de compost belemmeren.
Aanbevolen wordt 20 kg gips per ton toe te voegen aan de compost.
Stikstofsupplement wordt aan de compost toegevoegd om het stikstofgehalte van de natuurlijke compost te verhogen tot 1,5 procent of synthetische compost tot 1,7 procent.
Stikstofsupplementen zoals zadenmeel van sojabonen, katoen of pinda- en kippenmest kan worden gebruikt.
Synthetische compost vereist ook toevoeging van ammoniumnitraat of ureum.
De paalhoogte is 5 tot 6 voet op de betonplaat. Een verhoogde betonplaat is aan te raden om eventuele waterretentie te voorkomen door voor een goede afwatering te zorgen. Houd de stapel stevig en dicht vanaf de zijkanten, maar los van het midden voor een goede beluchting.
De optimale temperatuur van compost is 60 tot 80 graden Celsius. De intervallen tussen het aantal keren composteren is afhankelijk van de temperatuur en de toestand van het compostmateriaal.
De balans van watertoevoeging aan compost moet te allen tijde worden gehandhaafd. Minder water zal ertoe leiden dat de voedselproductie voor paddenstoelen stopt en overtollig water zal leiden tot het stoppen van de beluchting. Een goede balans van microbiële activiteit, voedingswaarde, water, en temperatuur zijn allemaal nodig en onbalans van zelfs maar één component kan de kwaliteit van de compost verpesten.
Het composteren duurt een tot twee weken, afhankelijk van de toestand van het compostmateriaal en het keren.
De gewenste compost moet zacht, buigzame rietjes; een sterke geur van ammoniak; temperatuur van bijna 75 graden Celsius of hoger; chocoladebruin van kleur; en vochtgehalte van 68 tot 74 procent.
Fase II
Stap 2. De compost instellen
Deze stap is voor pasteurisatie van de compost om insecten te elimineren, ongedierte, schimmels en nematoden. Het is ook nodig om ammoniak te verwijderen. Het percentage ammoniak moet kleiner zijn dan 0,07.
Er zijn drie soorten methoden die voor deze stap worden gebruikt. Compost wordt geplaatst in kamers met een gecontroleerde optimale omgeving.
Houten tray methode:Compost wordt verpakt in houten trays en op elkaar gestapeld.
Bedsysteem methode:Compost wordt verspreid over bedden in de klimaatkamers.
Bulksysteemmethode:De compost wordt opgestapeld op geperforeerde cementblokbakken.
De-ammonificerende organismen zullen onder geschikte omstandigheden koolhydraten en stikstof gebruiken en daardoor overtollige ammoniak uit de compost verwijderen.
Over het algemeen, voor deze stap worden twee soorten gecontroleerde omgevingen gebruikt:
Omgeving met lage temperaturen:De temperatuur van de compost wordt verhoogd tot 52 graden Celsius. Daarna wordt de temperatuur met ongeveer 1 graad Celsius verlaagd totdat de ammoniaklucht volledig verdwenen is.
Omgeving met hoge temperaturen:De temperatuur van de compost wordt gedurende ongeveer 6 tot 8 uur verhoogd tot 63 graden Celsius. Dit kan door stoom in de compost te injecteren. En dan wordt de temperatuur teruggebracht tot 60 graden Celsius. Daarna, de compost wordt elke dag op natuurlijke wijze afgekoeld bij een temperatuur van 1 tot 2 graden totdat het gehalte aan ammoniak is verlaagd tot het gewenste niveau.
De optimale temperatuur van compost is 24 tot 27 graden Celsius. Het vochtgehalte moet tussen 68 en 72 procent zijn en het stikstofgehalte moet 2 tot 2,4 procent zijn. 2,5 tot 3,2 kg compost per vierkante voet van de tray is aan te raden om de champignonproductie/opbrengst te maximaliseren.
Stap 3. Paaien/zaaien van het paddenstoelenmycelium
In de natuur, paddenstoelen worden vermeerderd door microscopisch kleine sporen van onder de paddenstoelkap. Maar deze sporen kunnen niet worden gehanteerd als zaden om in de compost te zaaien.
Vandaar, Paddenstoelen worden geplant met mycelium, een dunne draad als cel van een paddestoel.
Vegetatief vermeerderd mycelium staat bekend als spawn.
Traditioneel werden spawns met de hand gemengd met de compost.
In modern traysysteem, spawn wordt gemengd in de compost terwijl trays door de transportband bewegen.
In het beddensysteem spawn wordt gemengd met compost met paaimachines die kleine vingerachtige texturen hebben.
In de gecontroleerde omgeving wordt een temperatuur van 24 graden Celsius gehandhaafd. Het mycelium van de spawns zal samenkomen en een witte massa op de compost produceren. Het handhaven van een constante temperatuur is erg belangrijk omdat een hoge temperatuur het mycelium zal doden en een lage temperatuur de groei van het mycelium zal vertragen.
Stap 4:Behuizing
Voor de vorming van paddenstoelen wordt een topdressing-grond op de compost aangebracht. Deze stap wordt behuizing genoemd.
Een mengsel van kalksteen en veenmos, teruggewonnen compost, koemest met tuingrond, of klei-leemgrond zijn een goede optie om op de compost te dekken.
Wanneer mycelium samensmelt, het vormt een dikke snaarachtige structuur die rhizomorfen worden genoemd. Deze rhizomorfen groeien uit tot paddenstoelen.
Het omhulsel moet altijd worden gepasteuriseerd voordat het wordt aangebracht om insecten of ziekteverwekkers te doden.
Omhulsel moet gelijkmatig op de compost met de juiste diepte worden aangebracht. Zodat de spawns kunnen doordringen en uitgroeien tot gezonde paddenstoelen.
De compost moet in een gecontroleerde omgeving worden geplaatst met een goede luchtvochtigheid en een temperatuur van 24 graden Celsius.
De temperatuur van de compost moet elke dag met ongeveer 1 graad Celsius worden verlaagd totdat er kleine paddenstoelen uit de compost komen.
Het water geven na het omhullen is een kunst die een kweker zal leren na het opdoen van ervaring.
Stap 5:Vastzetten
Na de behuizing, een uitgroei van de rhizomorfen is gelijkmatig over het compostbed te zien. Deze uitgroeiingen worden "initieel" genoemd.
Wanneer de "initial" groter wordt (ongeveer 4 keer de grootte van een "initial"), het wordt een "pin" genoemd.
Over bijna 3 weken, deze pinnen zullen uitgroeien tot oogstbare paddenstoelen.
Zorg ervoor dat het kooldioxidegehalte in de lucht 0,08 procent of lager is.
Het verlagen van het kooldioxidegehalte wordt gedaan door verse lucht in het systeem te brengen.
De beste tijd om verse lucht in te voeren is het moment waarop mycelium uit het omhulseloppervlak te zien is.
Vroege reductie van kooldioxide kan leiden tot langzame groei van mycelium. De paddenstoelen kunnen beginnen te groeien van onder het oppervlak van de darm, wat resulteert in vuile paddenstoelen.
Het vastzetten is erg belangrijk omdat het de opbrengst en de kwaliteit van de paddenstoelen dicteert.
Stap 6:Bijsnijden
Het oogsten van de paddenstoel is afhankelijk van de kwaliteit en het groeistadium van de paddenstoel.
Bijvoorbeeld, in sommige delen van de wereld, zoals Noord-Amerika, klanten geven de voorkeur aan een paddenstoel met een strak gesloten sluier. Terwijl, in sommige delen van de wereld, zoals Europa, klanten geven de voorkeur aan paddenstoelen met grotere langwerpige sluiers.
Het oogsten van champignons bestaat uit cycli van bijsnijden/oogsten die doorgaans worden uitgebreid in een cyclus van 3-5 dagen. Deze teeltcycli staan bekend als bloei, spoelen of breken.
Verschillende boeren volgen verschillende teeltpatronen, afhankelijk van de markt en de eisen van de klant. Sommige boeren oogsten al in 30 dagen paddenstoelen en aan de andere kant, sommige boeren kunnen de oogsttijd verlengen tot 150 dagen.
Afhankelijk van de paddenstoelensoort, het plukken van de paddenstoel om te oogsten kan verschillen.
* Een must om te lezen: 8 soorten bodems van India en bodemverdeling in India
Gids voor verschillende champignonteelt in India
Nu we de algemene vuistregels voor het kweken van paddenstoelen hebben besproken, laten we eens kijken naar de landbouwtechnieken en aanbevelingen voor verschillende champignonteelt in India.
Laten we de basis en de gebruikelijke procedures uit de weg ruimen voordat we kennis maken met het kweken van verschillende paddenstoelen.
Eerste en tweede stap van de champignonteelt, d.w.z. composteren en afwerken van composteren zijn vrijwel hetzelfde voor alle paddenstoelen zoals melkachtig, padie stro, oester, Reishi en Shiitake.
Zoals eerder in het artikel besproken (in zes stappen voor de champignonteelt) zijn er twee soorten compost:synthetische compost en natuurlijke compost.
Synthetische compost voor de champignonteelt
Zoals de naam al doet vermoeden, het haalt de voedingsstoffen uit synthetisch gemaakte componenten zoals ureum, gips en calciumammoniumnitraat of ammoniumsulfaat.
Het hooistro wordt in lengtes van 8 tot 20 cm gesneden en gelijkmatig over een compostbed verdeeld en gelijkmatig met water bewaterd.
Laten we uitgaan van een traymaat van 1 meter x 0,5 meter x 0,15 meter voor het kweken van champignons. Ook, laten we aannemen dat we 15 van dergelijke trays gaan gebruiken voor de champignonteelt. Benodigde ingrediënten:
VEREIST INGREDINTEN
HOEVEELHEID VEREIST
Tarwestro
250 KG
Ureum
3 KG
Gips
20 KG
Rijst/tarwezemelen
20 KG
Ammoniumsulfaat/calciumammoniumnitraat
3 KG
* Een must om te lezen: Complete gids voor soorten meststoffen:hun classificatie en gebruik
Een stapel wordt gemaakt door alle ingrediënten behalve gips te mengen.
De poolhoogte kan variëren van 1 meter tot 2 meter. Laten we uitgaan van een poolhoogte van 1 meter bij een breedte van 1 meter.
De paal dient een stevige en dichte buitenkant te hebben maar een zacht midden zodat de beluchting goed kan plaatsvinden.
Zoals eerder gezegd, het proces van het openen en opnieuw mengen van de compost wordt "draaien" genoemd. Het aantal keer draaien is afhankelijk van de staat van de ingrediënten en het klimaat. Verschillende boeren hebben verschillende regimes voor het keren.
Inschakelen kan op:
DAG
DRAAIBEHEER
1e dag
Draaien zonder aanvulling op de compost
4e dag
Draaien zonder aanvulling op de compost
8e dag
Draaien zonder aanvulling op de compost
12e dag
Meedraaien met toevoeging van 10 Kg Gips
16e dag
Meedraaien met nog eens 10 Kg Gips
20e dag
Draaien en ook toevoegen van 10 ml (Malathion, PUNT, Lindaan, BHC) in 5 liter water
Kippenmest heeft hogere nutriëntengehaltes zoals stikstof (4,55 tot 5,46 %), fosfor (2,46 tot 2,82 %), kalium (2,02 tot 2,32 %), calcium (4,52 tot 8,15 %), magnesium (0,52 tot 0,73%). Eventueel kunt u ook 60 KG kippenmest bij de compost doen.
Natuurlijke compost voor de champignonteelt
Zoals de naam al doet vermoeden, deze compost is gemaakt met natuurlijke ingrediënten.
Opnieuw, laten we uitgaan van de schaalgrootte van 1 meter x 0,5 meter x 0,15 meter voor het kweken van paddenstoelen. Ook, laten we aannemen dat we 15 van dergelijke trays gaan gebruiken voor de champignonteelt. Benodigde ingrediënten:
VEREIST INGREDINTEN
HOEVEELHEID VEREIST
Pluimveemest
100 KG
Tarwestro
350 KG
Paardenmest
1000 KG
Gips
25 KG
De ingrediënten worden gemengd en bevochtigd met water op de composteerplaats.
Er wordt een stapel compost gemaakt en geobserveerd totdat deze een ammoniaklucht begint af te geven.
De stapel compost wordt om de 4 dagen en in 3 . gekeerd
rd
en 4
e
draaien 25 kg gips wordt toegevoegd per ton compost.
In de laatste beurt kun je 10 ml Malathion toevoegen, PUNT, Lindaan of BHC in 5 liter water aan de compost.
* Een must om te lezen: Complete gids voor soorten meststoffen:hun classificatie en gebruik
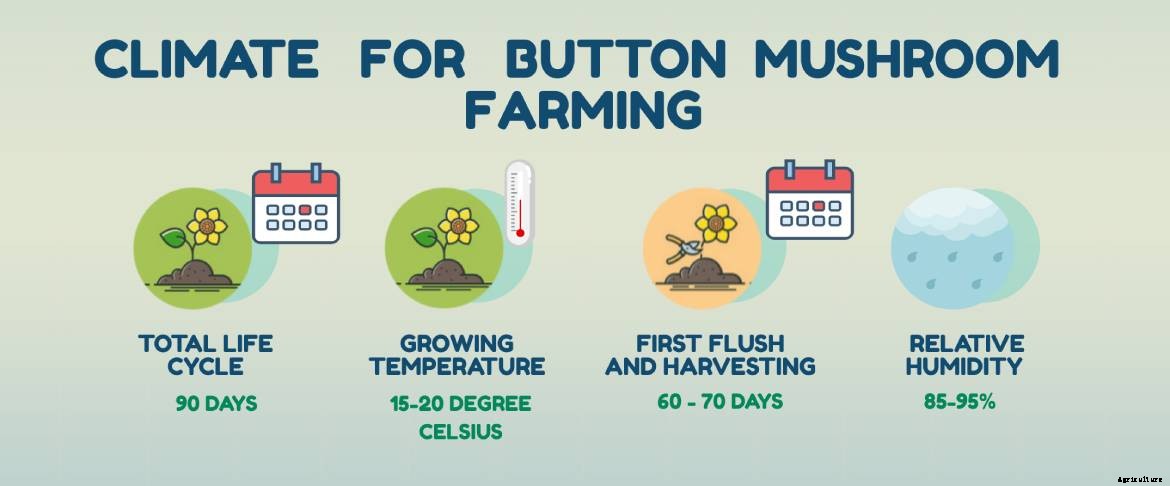
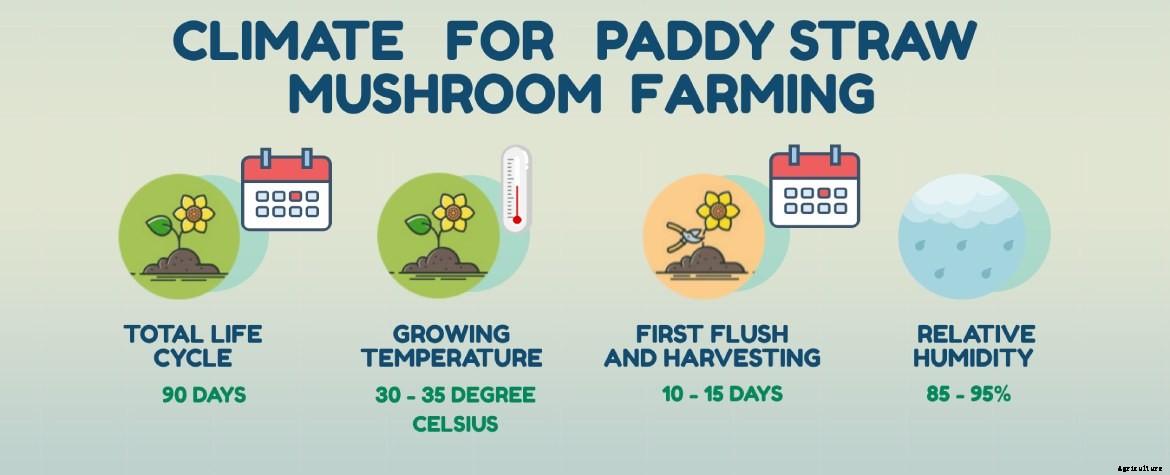
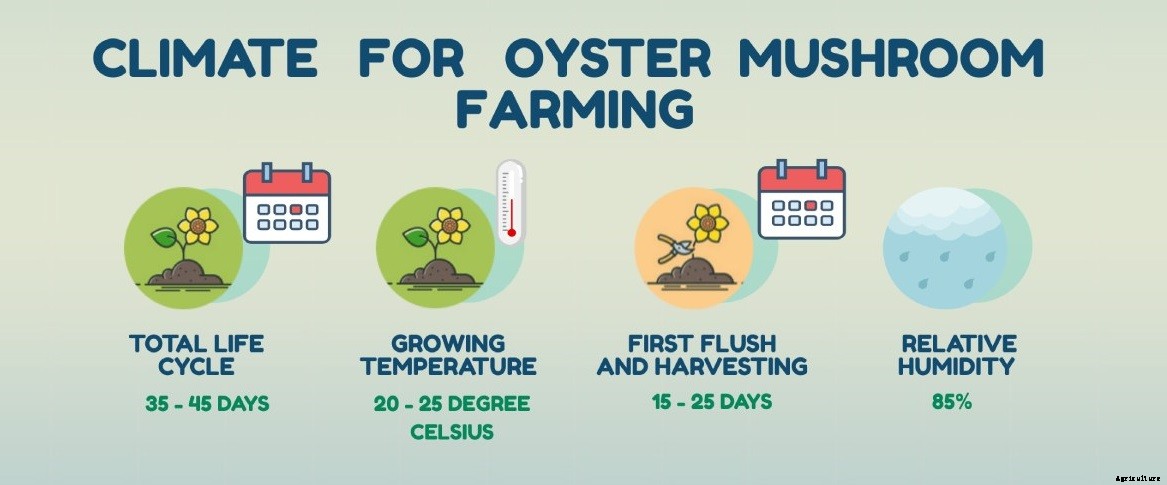
Klimatologische omstandigheden voor de champignonteelt in India
De volgende tabel geeft een overzicht van de klimatologische omstandigheden, opslag condities, details van de eerste spoeling, opbrengst en geschatte kosten van champignons, oesterzwam, pady stro muashroom en melkachtige paddenstoelen landbouw in India.
KENMERKEN
PADDENSTOEL KNOP
OESTERZWAM
PADDY STRO PADDESTOEL
MELKACHTIGE PADDESTOEL
SOORT
Agaricus Spp
Pleurotus Spp
Volveriella Spp
Calocybe Indica
SUBSTRAAT
Compost
Padie Stro
Padie Stro
Padie Stro
GROEITEMPERATUUR
15-20°C
20-25°C
30-35°C
30-35°C
RLATIEVE VOCHTIGHEID
85-95%
85%
85-95%
85%
TOTALE LEVENSCYCLUS
90 dagen
35-45 dagen
90 dagen
45 - 50 dagen
EERSTE SPOEL EN OOGST
60 -70 dagen
15 - 25 dagen
10 - 15 dagen
24 - 28 dagen
YEILD
800-900 gram / Bed (4 Kilo Gram Compost)
635 gram (500 gram Paddy Straw)
800-900 gram / Bed (4 Kilo Gram Compost)
700 gram (500 gram Paddy Straw)
HOUDBAARHEID (KAMERTEMP.)
2 dagen
2 dagen
1 dag
3 dagen
HOUDBAARHEID (GEKOELD)
3 dagen
3 dagen
2 dagen
5 - 7 dagen
EIWIT
23,90%
23,60%
23,90%
32%
PRODUCTIE KOSTEN
120* INR
80* INR
60* INR
70* INR
*De in de tabel vermelde prijzen kunnen van staat tot staat verschillen.
Gids voor het kweken van champignons in India
Na fase I en fase II van het maken van compost en pasteurisatie van compost, we kunnen beginnen met het paaien en kweken van de paddenstoelen.
De compost voor champignons inladen
De afmeting van de lade die in deze handleiding wordt aangenomen, is 1 meter x 0,5 meter x 0,15 meter.
In de bak wordt compost gevuld met een diepte van 15-18 cm.
De compost mag alleen aan de oppervlakte voorzichtig worden samengeperst.
Zorg voor voldoende afstand tussen de trays wanneer ze over elkaar worden gestapeld. Een afstand van 15 cm is aan te raden.
Paaien van champignons
Het mengen van spawns met de compost wordt spawnen genoemd.
Er worden verschillende paaitechnieken gebruikt:
Paaiplaats:er wordt een gat van 5 cm diep in de compost gemaakt en er worden brokken spawn in het gat geplaatst. De afstand tussen de spawns is 20-25 cm. de gaten worden later bedekt met compost.
Paaien aan de oppervlakte:de spawns worden gelijkmatig over de compost verdeeld en gemengd op een diepte van 3-5 cm. later wordt de bovenkant bedekt met een dunne laag compost.
Laagpaaien:3 tot 4 lagen paai worden gemengd met compost, en later bedekt met een dunne laag compost.
Het broed wordt gemengd met de compost in een hoeveelheid van 7,5 ml/kg of 500-700 gram / 100 kg compost.
500 gram broed is voldoende voor 5 standaard trays.
Na het afzetten worden de trays gestapeld.
Er moet een afstand van 1 meter zijn van het plafond en de bovenste lade.
Kuitlopen van champignons
De ontstane compost is nu bedekt met krantenpapier of plastic vellen.
De schimmeldraad heeft 12 – 14 dagen nodig om de hele compost te koloniseren.
De temperatuur in de teeltruimte is 24±2 graden Celsius.
De relatieve luchtvochtigheid moet rond de 90% zijn. De vloer en de muren van de kamer kunnen indien nodig worden bewaterd om de vochtigheid te verhogen.
Een hogere kooldioxideconcentratie in de lucht zorgde voor extra voordelen in deze fase van de champignonteelt.
Omhulsel van champignons
Nadat de spawn-run is voltooid, het compostbed moet bedekt zijn met een omhulsel van ongeveer 3-4 cm dik.
De behuizing moet poreus zijn, moet water kunnen vasthouden en een pH-waarde van 7 – 7,5 hebben.
Veenmos wordt beschouwd als het beste omhulselmateriaal.
Mix van tuin Leemgrond en zand (4:1), verbruikte compost (2-3 jaar oud), koemest en leemgrond (1:1); gebrande rijstschil, zand en kalk zijn veelgebruikte omhullingsmaterialen.
De behuizing moet voor het aanbrengen worden gepositioneerd. Voor pasteurisatie kunt u de grond stomen of formaldehyde (2%) en bavistin (75 ppm) gebruiken.
Omhulselpasteurisatie moet minstens 10 dagen vóór gebruik in de compost worden gedaan.
Na het aanbrengen van de omhulling wordt de temperatuur gehandhaafd op 24 ± 2 graden Celsius en wordt de relatieve vochtigheid van 85-90% gehandhaafd.
Vruchtvorming van champignons
De temperatuur wordt elke dag langzaam met bijna 1 graad Celsius verlaagd tot 18 graden Celsius.
Door de ruimte te ventileren wordt het kooldioxidegehalte in de lucht verlaagd tot 0,08-0,15%.
De "initialen" beginnen samen te smelten om speldenkoppen te vormen, uiteindelijk overgaand in de knopvormende fase.
Oogsten van champignons
Eerste spoeling, bloei of breuk verschijnt na bijna 3 weken dekken of 5 tot 6 weken paaien.
Het is erg belangrijk om de behuizing goed te coaten alsof deze te dik is, de paddestoelen komen er vies uit.
Het oogsten gebeurt in knopstadium wanneer de doppen/sluiers 2,5 tot 4 cm groot zijn.
De champignons moeten worden geoogst door de stengel licht te draaien zonder de dekaarde te verstoren.
De gaten na de oogst opnieuw vullen met dekaarde en water geven.
Opbrengst champignons
Per tray kun je 3 tot 6 kg champignons verwachten, afhankelijk van de precieze verzorging en het onderhoud in elke afzonderlijke fase van de champignonteelt
18-20 kg per 100 kg compost is een gewenste gewasopbrengst van 2 maanden oude cultuur.
Bewaren van champignons
Lange termijn opslag:
Inblikken is de meest geprefereerde bewaartechniek. Dit maakt het gemakkelijk om te exporteren.
Behalve inblikken, vriesdrogen, beitsen en IQF zijn ook enkele gevolgde praktijken.
Champignons worden meestal niet gedroogd, in tegenstelling tot oesterzwammen, shitake of padie.
Korte termijn opslag:
Champignons zijn zeer bederfelijke goederen en moeten daarom worden overgebracht naar een koelcel zodra ze zijn geoogst.
Champignons zijn 3-4 dagen houdbaar bij 4-5 graden Celsius.
Champignons mogen niet worden gewassen. Maar als wassen nodig is, voor het verwijderen van vuil moet een mengsel van 10 liter water met 5 gram Kaliummetabisulfiet worden gebruikt.
Op sommige plaatsen wordt ook gebruik gemaakt van verpakkingen met een aangepaste atmosfeer of verpakkingen met een gecontroleerde atmosfeer.
Gids voor paddystro-champignonteelt in India
Een van de oudste en meest gebruikte technieken van de champignonteelt is paddystro-champignonteelt. Het is een eetbare paddenstoel uit de tropen en subtropen.
Andhra Pradesh, Kerala, Orissa, Tamil Nadu en West-Bengalen zijn de staten die paddystro-paddenstoelen produceren in India. Maar aangezien de opbrengst (10-15% droog substraat) van deze teelttechniek laag is, de totale opbrengst van deze staten is ook erg laag.
Binnenteelttechnologie heeft de opbrengst (35-40% biologische efficiëntie) van paddystro-paddenstoelen verhoogd en heeft de paddy-champignonteelt een semi-geïndustrialiseerde status gebracht.
De binnenkweekmethode van paddystro-paddenstoelen heeft de volgende componenten en stappen:
Substraat voor paddystro-paddenstoelen
Padie stro
Katoenafval heeft meer de voorkeur als paddystro.
Omdat katoenafval meer cellulose en hemicellulose bevat, het kan meer vocht vasthouden en elimineert de behoefte aan water in latere stadia van de teelt.
Dit helpt ook bij het minimaliseren van het risico op beschadiging van de primordia.
De compost voorbereiden voor paddystro-paddenstoelen
Het substraat zoals paddystro of katoenegreneringsafval of een mengsel van paddystro en katoenegreneringsafval met een verhouding van 1:1 wordt de eerste 2 dagen bevochtigd.
5% Pluimveemest wordt toegevoegd aan de stapel met afmetingen 1,5 meter hoog x 1,5 meter breed.
Echter, er wordt niets toegevoegd aan het afval van de katoenverwerker.
De compost wordt in twee dagen twee keer gekeerd (1 keer per dag)
Bij de derde bocht, 1,5% calciumcarbonaat wordt aan de compost toegevoegd en laat het de komende 2-3 dagen fermenteren.
Pasteurisatie en strooisel voor paddystro-paddenstoelen
De compost wordt na bijna 3-4 dagen buitencomposteren op planken of bedden verspreid.
De dikte van de bedden wordt bepaald door het seizoen waarin de teelt plaatsvindt. De dikte van het bed varieert van 5 cm tot 10 cm.
In de zomer heeft een mindere dikte van het bed de voorkeur.
De compost wordt gelijkmatig verdeeld en na 12 uur wordt de compost onderworpen aan stoom.
Een temperatuur van 60 graden Celsius wordt gedurende 4-5 uur gehandhaafd voor katoenafvalcompost en een temperatuur van 65 graden Celsius wordt gedurende bijna 6 uur gehandhaafd voor paddystro-compost. Deze methode posturiseert de compost.
De compost wordt vervolgens 36 uur op een temperatuur van 50 graden Celsius gehouden en daarna op natuurlijke wijze afgekoeld.
Paaien van paddystro-paddenstoelen
Het paaiproces kan worden gestart wanneer de compost afkoelt tot een temperatuur van 35 graden Celsius.
Spawns van paddystro-paddenstoelen worden graanspawns genoemd omdat ze zijn gemaakt van granen of gierst.
Spawns gemaakt van geweekte paddy zwerfafval worden stro spawns genoemd.
De compost wordt uitgezet met vers broed @ 1,5% (droog gewicht) of 0,4% (nat gewicht) basis van de compost.
De spawns worden 2 tot 2,5 cm diep in de compost gestoken met een tussenruimte van 12 tot 15 cm.
Het compostbed wordt bedekt met een dun plastic vel nadat de spawns met compost zijn bedekt.
Paaien van paddystro-paddenstoelen
Voor de spwanloop wordt een vaste temperatuur aangehouden van 32 tot 34 graden Celsius.
Deze temperatuur is ideaal voor kolonisatie van de compost.
Katoenafvalcompost heeft 4-5 dagen nodig om te koloniseren, terwijl paddystrocompost 5-6 dagen nodig heeft voor kolonisatie.
Gewasbeheer en bevruchting van paddystro-paddenstoelen
In de fase van het spawnen, zorg voor voldoende ventilatie.
Water en licht zijn niet nodig.
Na 4 dagen, je kunt tl-verlichting in de kamer toevoegen.
De plastic vellen die werden gebruikt om de compost in de paaifase te bedekken, worden nu verwijderd op de 5 '
e
dag en er wordt zachtjes water over de bedden gespoten.
De speldenknop begint te verschijnen op 5-6
e
dag van paaien.
Oogsten van paddystro-paddenstoelen
De eerste bloei of breuk of flush van paddystro-paddenstoelen is te zien na 4 tot 5 dagen speldenknopvorming.
Relatieve luchtvochtigheid van 80%, temperatuur van 30 graden Celsius, regelmatige frisse lucht en tl-lampen kunnen de opbrengst aanzienlijk verhogen.
Mushrooms can be harvested as early as when the volva just breaks and reveals the mushroom.
This mushroom grows very fast and hence sometimes it is harvested twice or thrice a day.
The first flush constitutes 70 – 90% of the total mushroom yield.
Harvesting should be done by gently lifting, shaking and slightly twisting the mushroom from the bed.
Reframing from cutting the mushrooms using tools while harvesting. The stalk left behind in the bed might result in infestation of pests and lead to decreased yield.
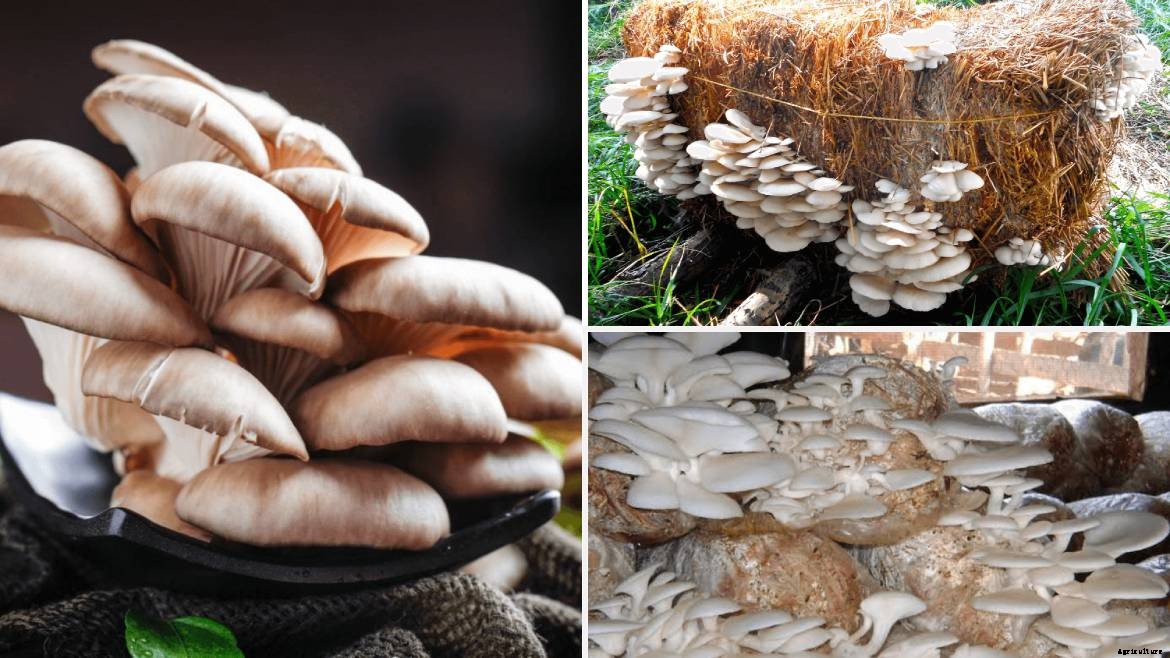
Guide to Oyster/ Dhingri mushroom farming in India
Technology used for the cultivation of the culinary and medicinal mushroom Pleurotus Spp. Often regarded as an oyster mushroom, has been standardized on locally available substrates.
The cultivation of pink, gray, white, geel, brown, and black oyster mushrooms is the same; there are only minor differences in the duration of spawn running and cropping.
Oyster mushrooms are easy to grow. Momenteel, it is very popular in many countries, particularly in South-East Asia, where cultivation of button mushrooms is not feasible under natural climatic conditions.
Substrate for oyster mushroom cultivation
Substrate for oyster mushroom cultivation can be all kinds of cellulosic farm wastes.
Banana pseudo stems, cotton ginning mill waste, leaves of maize, used citronella leaf, sugarcane bagasse, sawdust, jute, used tea leaf waste, synthetic compost of button mushrooms, paper mill sludges, coffee byproducts, tobacco waste, cereal straw and waste paper are some of the substrate options.
Paddy straw is the most commonly used substrate.
Compost preparation for oyster mushroom cultivation
The substrate is chopped into 1 to 2 cm long pieces, and soaked in water for 2 to 3 hours.
Pasteurization of the substrate depends on the level in which farming is being done.
Small scale production:soaked in hot water at 80 degrees Celsius for 2 hours
Semi- commercial production:Steamed at a temperature of 80 degrees Celsius in steam chamber.
Full-fledged commercial production:substrate is subjected to 121 degrees Celsius temperature with 15-pound op pressure for 15 minutes in an autoclave.
Spawning of oyster mushroom
The pasteurized substrate is brought to a temperature of 65 degrees Celsius and is packed in polypropylene bags.
The bags are plugged with non-absorbent cotton.
The bags are filled 2/3 with the substrate and 1/3 with air.
40 grams of grain spawn can be mixed with 1 kg of substrate.
Spawn running of oyster mushroom
The polypropylene bags are then put in a dark room with a temperature of 24-28 degrees Celsius for 18-30 days.
The number of days can differ depending on the variety of the oyster mushroom being farmed.
Crop management and fructification of oyster mushroom
After the designated number of days, the bags are then moved to a cropping room.
Holes are made on the polypropylene bag. The holes can be of 2 cm in diameter with a spacing of 4 cm.
Pinhead will start emerging from the openings within 2 to 7 days depending on the variety.
The adequate temperature ranges from 13-30 degrees Celsius and relative humidity ranges from 80 to 85%, depending on the variety of the oyster mushroom.
In almost 2 weeks the substrate inside the bags become compact. At this point you can cut the bags and place the compact substrates on shelves.
Harvesting of oyster mushroom
Harvestable crop will appear in almost 3 weeks.
The compact substrate cylinders now have a growth of oyster mushrooms on the outside.
The best time to harvest the oyster mushrooms is when the cap starts folding.
The fist flush can appear in 18-20 days and the subsequent second and third flush can appear in an interval of 7 days.
You can cut the oyster mushrooms with a tool or pluck it from the substrate gently by twisting.
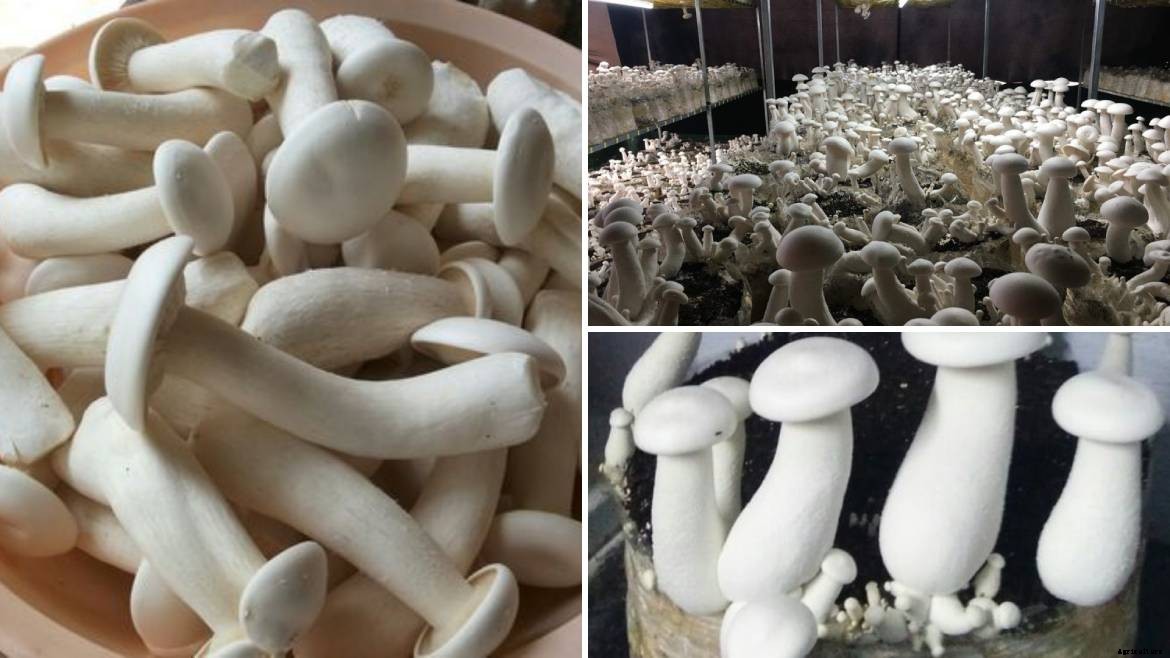
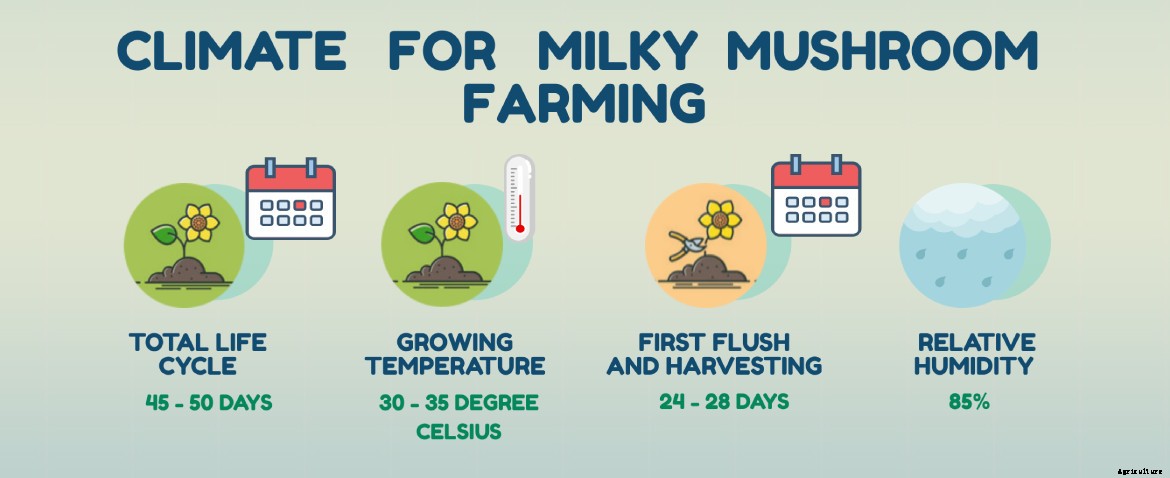
Guide to Milky mushroom farming in India
Milky mushrooms are named so because they are milky white in colour. It is the only species of mushroom that is indigenous to, and cultivated in, the hot, moist climate of India.
It is also known as “Swetha” mushroom or “summer” mushroom. It’s a tropical mushroom which can grow to be quite long and thick.
Karnataka, Tamil Nadu, Kerala, Odisha and Andhra Pradesh are the states in India having suitable climatic conditions to growth of milky mushrooms.
Substrate for milky mushrooms
Banana pseudo stems, cotton ginning mill waste, leaves of maize, used citronella leaf, sugarcane bagasse, sawdust, jute, used tea leaf waste, synthetic compost of button mushrooms, paper mill sludges, coffee byproducts, tobacco waste, cereal straw and waste paper are some of the substrate options.
Paddy straw is the most commonly used substrate.
Compost preparation for milky mushrooms
Substrate can be chopped in size of 4 to 5 cm or 1 to 2 cm.
Substrate is soaked in clean water for almost 6 hours.
Pasteurization of the substrate depends on the level in which farming is being done.
Small scale production:soaked in hot water at 80 degrees Celsius for 2 hours
Semi- commercial production:Steamed at a temperature of 80 degrees Celsius in steam chamber.
Full-fledged commercial production:substrate is subjected to 121 degrees Celsius temperature with 15-pound op pressure for 15 minutes in an autoclave.
At the end of this process the moisture content of substrate should be around 60%.
Spawning of milky mushroom
The substrate is kept in Polythene tube of dimensions 60 cm x 40 cm and a thickness of 100 gauge.
Organic supplements like wheat bran, paddy husk, maize meal or boiled wheat grain can also be added per bag. 100 grams per bag should be enough.
The substrate in put in the tubing to a height of 7.5 cm and 35 grams of spawn is mixed with the substrate.
Three such layers are made and the bag is closed with an insulating material like cotton.
The bag is lined with holes of 1 cm diameter for gas exchange. 20 such holes per bag are enough.
Spawn running of milky mushrooms
The bags incubated in a dark room with temperature of 30 to 38 degree Celsius and relative humidity of 80%.
The bags are kept in a dark room for 25-30 days.
Casing of milky mushrooms
Red soil or a mixture of red soil and Decomposed coir compost (1:1 ratio) is a good casing material for milky mushrooms cultivation bags.
The pH of the casing soil should be around 8.
The thickness of the casing is 2-3 cm.
Make sure to posturize the casing soil with chalk powder and kept in 15 psi in autoclave for few hours.
Posturizing the casing soil can also be done with 4 % formaldehyde a week before it is applied to the bags.
Proper turning of the casing soil is done regularly to eliminate most of the traces of formalin.
For casing of the bags, the bags are open and a uniform layer of casing material is allied to the substrate with the spawn.
Crop management and fructification of milky mushroom
After almost 10 days, the mycelium will penetrate the casing layer.
As the pinheads start appearing, the bags are moved to cropping room with a temperature of 30 to 38 degrees Celsius and relative humidity of 80 to 85%.
The room should have adequate light and ventilation as well.
Harvesting of milky mushroom
When the milky mushrooms grow to a diameter of 8 to 10 cm, the crop is harvested.
The milky mushrooms are harvested by twisting gently from the base.
By using this cultivation method, a 6-week crop can yield almost 1 kg of mushrooms per bag.
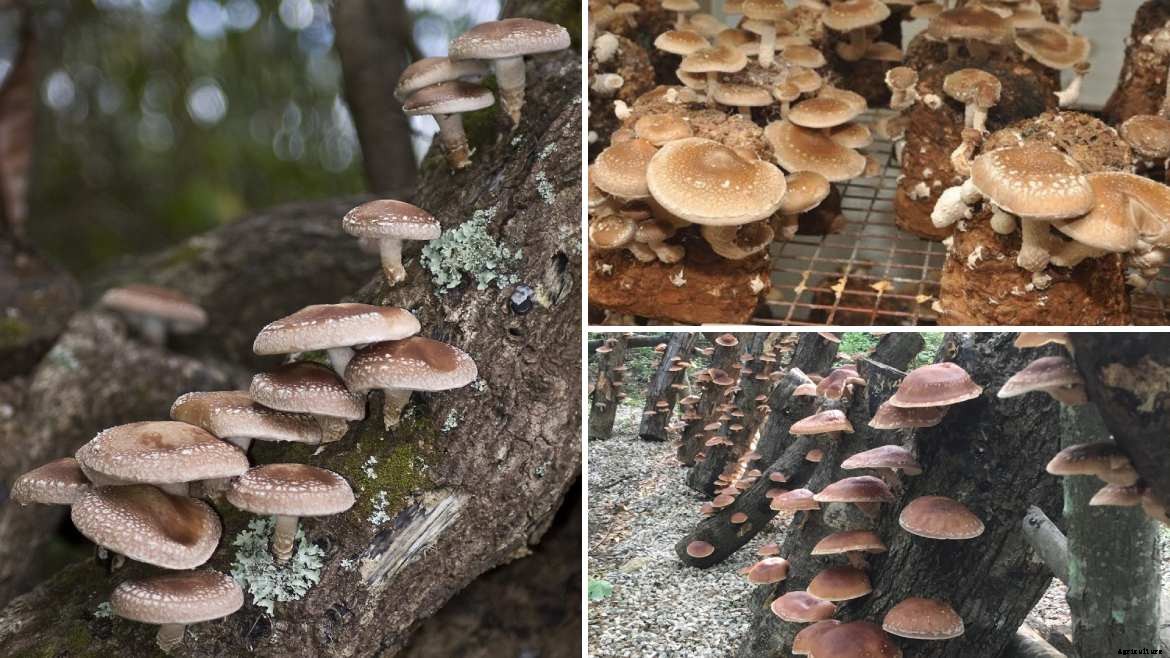
Guide to Shiitake mushroom farming in India
Shiitake mushroom, an edible and medicinal mushroom can be easily grown for commercial purposes.
It is not only a good source of protein and vitamin B, but its zero fat and sugar content make it a very good option for diabetics and heart patients.
Lentinan, a compound extracted from these mushrooms, is also used in manufacturing of a drug for cancer.
It can be cultivated in hardwood sawdust of teakwood, Sal and Indian Kino tree.
Substrate for Shiitake mushrooms
Rice bran, wheat bran, wood chips, hard wood sawdust, eucalyptus sawdust, teakwood saw dust, and calcium sulphate are some of the substrate options.
Saw dust should not be a fine powder, as water logging with reduce the speed of growth of mycelium.
A very coarse saw dust is also not recommended as it is hard to pack in bags and your compost will contain too much air.
A mix of coarse and fine sawdust is generally preferred.
Compost preparation for Shiitake mushrooms
Sawdust is wetted for few hours.
The substrate should not be wetted heavily. A good hydration test is squeezing the substrate in your hand as tightly as possible and only few drops of water should drip.
If there are dry patches, add little bit of water.
Good hydrated substrate ratio examples can be a mix of 1kg of sawdust, 250g of wheat/rice bran and 1.6 L of water OF 1Kg of sawdust and 1.5L of water OF 1Kg of wheat/rice bran with 0.5 L of water.
Pasteurization of the substrate can be done by subjecting it to 121 degrees Celsius temperature with 15-pound op pressure for 120 minutes in an autoclave.
At the end of this process the moisture content of substrate should be around 65%.
Spawning of Shiitake mushroom
The substrate is kept in Polypropylene bags.
1 Kg of substrate is mixed with 40 grams of spawning material.
Unlike other bag mushroom farming methods, no holes for ventilation are required in this case.
Spawn running of Shiitake mushrooms
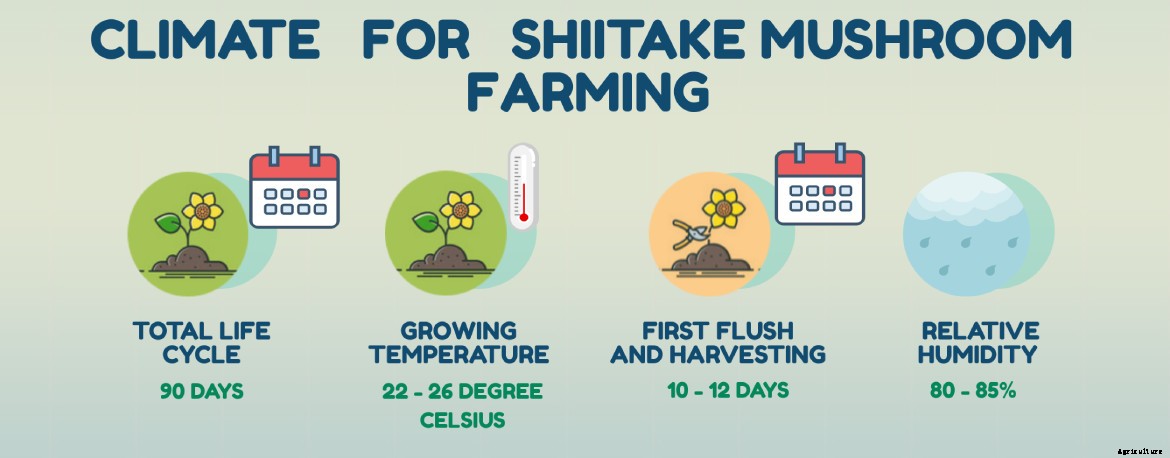
The bags incubated in a dark room with temperature of 22 to 26 degree Celsius.
The bags are kept in a dark room for 60-70 days.
Mycelial coat formation (a white substance) will start followed by the formation of blisters.
Crop management and fructification of Shiitake mushroom
Typisch, Shiitake mushrooms take 8-12 weeks to colonize.
When the substrate turns completely brown, remove the Polypropylene bag. And moved to a cropping room.
The brown blocks are now shock treated with spraying cold water with a temperature of 10 to 15 degrees Celsius.
After 10-12 days of shock treatment, the shiitake mushrooms are ready to harvest. but this also depends on how cold is the weather.
As the pinheads start appearing in the cropping room with a temperature of 22 to 26 degrees Celsius and relative humidity of 80 to 85%.
The room should have adequate light and cross ventilation as well.
Harvesting of Shiitake mushroom
When the milky mushrooms grow to a diameter of 3 to 6 inches, the crop is harvested.
The milky mushrooms are harvested by twisting gently from the base.
Harvest the Shiitake mushrooms when the gills underneath the mushrooms are visible and the outer edge is slightly curved.
If the edge of the mushroom is flat, then the mushroom is over ripped. It is still edible though.
Don’t wash the mushrooms after harvesting.
Immediately refrigerate the mushrooms within 1 hour of harvesting.
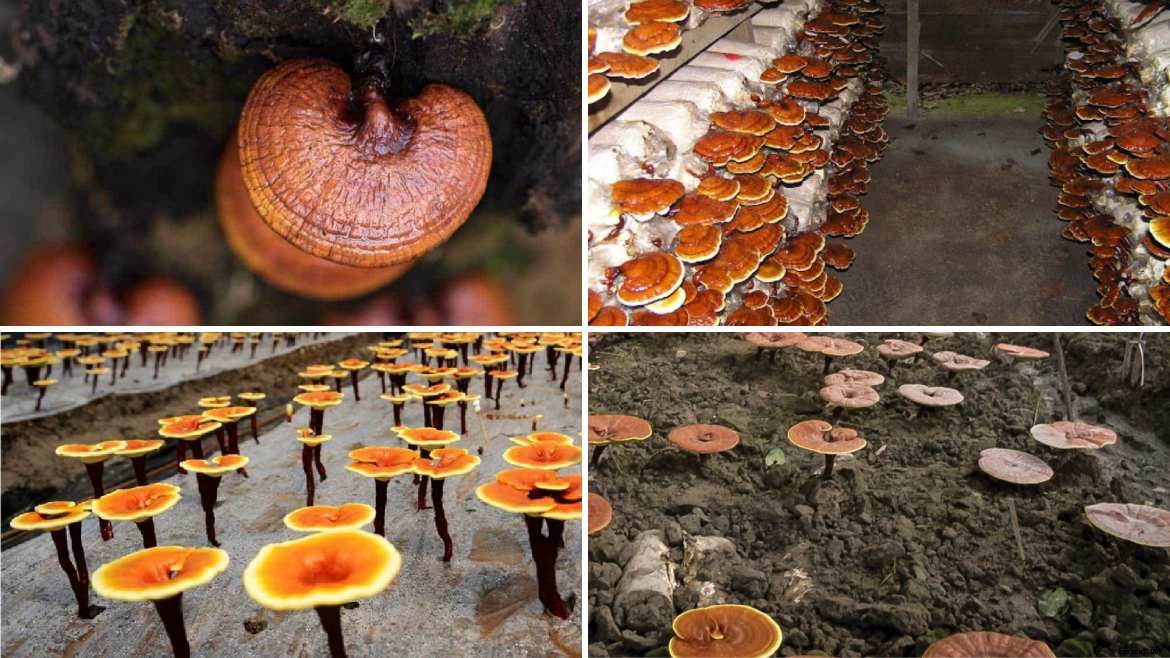
Guide to Reishi mushroom farming in India
Reishi mushroom is mostly cultivated because of its pharmacological importance. Global trade of this mushroom has crossed more than 2 billion dollars. This makes this mushroom as good candidate for cultivation commercially.
It is considered as almost a panacea in few cultures like Japanese and Chinese. It is believed to have medicinal characteristics such as anticancer, antioxidants, hypoglycemic, anti-HIV, anti-heart attack, cholesterol lowering as well as anti-angiogenic.
Since this mushroom is grown exclusively for medicinal purposes, its farming should be done organically.
It can be grown in poly-houses and also in the environmentally-controlled cropping rooms.
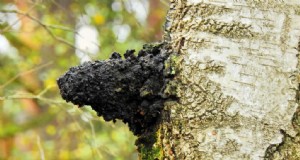
These mushrooms are typically naturally found in dead or dying hardwood in warmer temperatures in the month of May to November.
Substrate for Reishi mushrooms
Organically supplemented hardwood saw dust like eucalyptus tree saw dust or teak wood saw dust.
Saw dust of broad leaves trees like coconut, Sheesham and mango is also preferable.
Saw dust should not be a fine powder, as water logging with reduce the speed of growth of mycelium.
A very coarse saw dust is also not recommended as it is hard to pack in bags and your compost will contain too much air.
A mix of coarse and fine sawdust is generally preferred.
Compost preparation for Reishi mushrooms
Saw dust is mixed with 20% of wheat/rice bran.
Sawdust is wetted for few hours.
The substrate should not be wetted heavily. A good hydration test is squeezing the substrate in your hand as tightly as possible and only few drops of water should drip.
If there are dry patches, add little bit of water.
The desired pH level of 5.5 is obtained by adding calcium carbonate (chalk powder) and calcium sulphate (gypsum).
Pasteurization of the substrate can be done by subjecting it to 121 degrees Celsius temperature with 15-pound op pressure for 120 minutes in an autoclave.
At the end of this process the moisture content of substrate should be around 65%.
Spawning of Reishi mushroom
The substrate is kept in Polypropylene bags with the mouth of the bag sealed with a non-adsorbent material like cotton.
Sterilization of the bags is done in autoclave for 2 hours under a pressure of 22 PSI.
The substrate in the bag is spawned with wheat grain or saw dust spawn at the rate of 3% of the total dry weight.
Spawn running of Reishi mushrooms
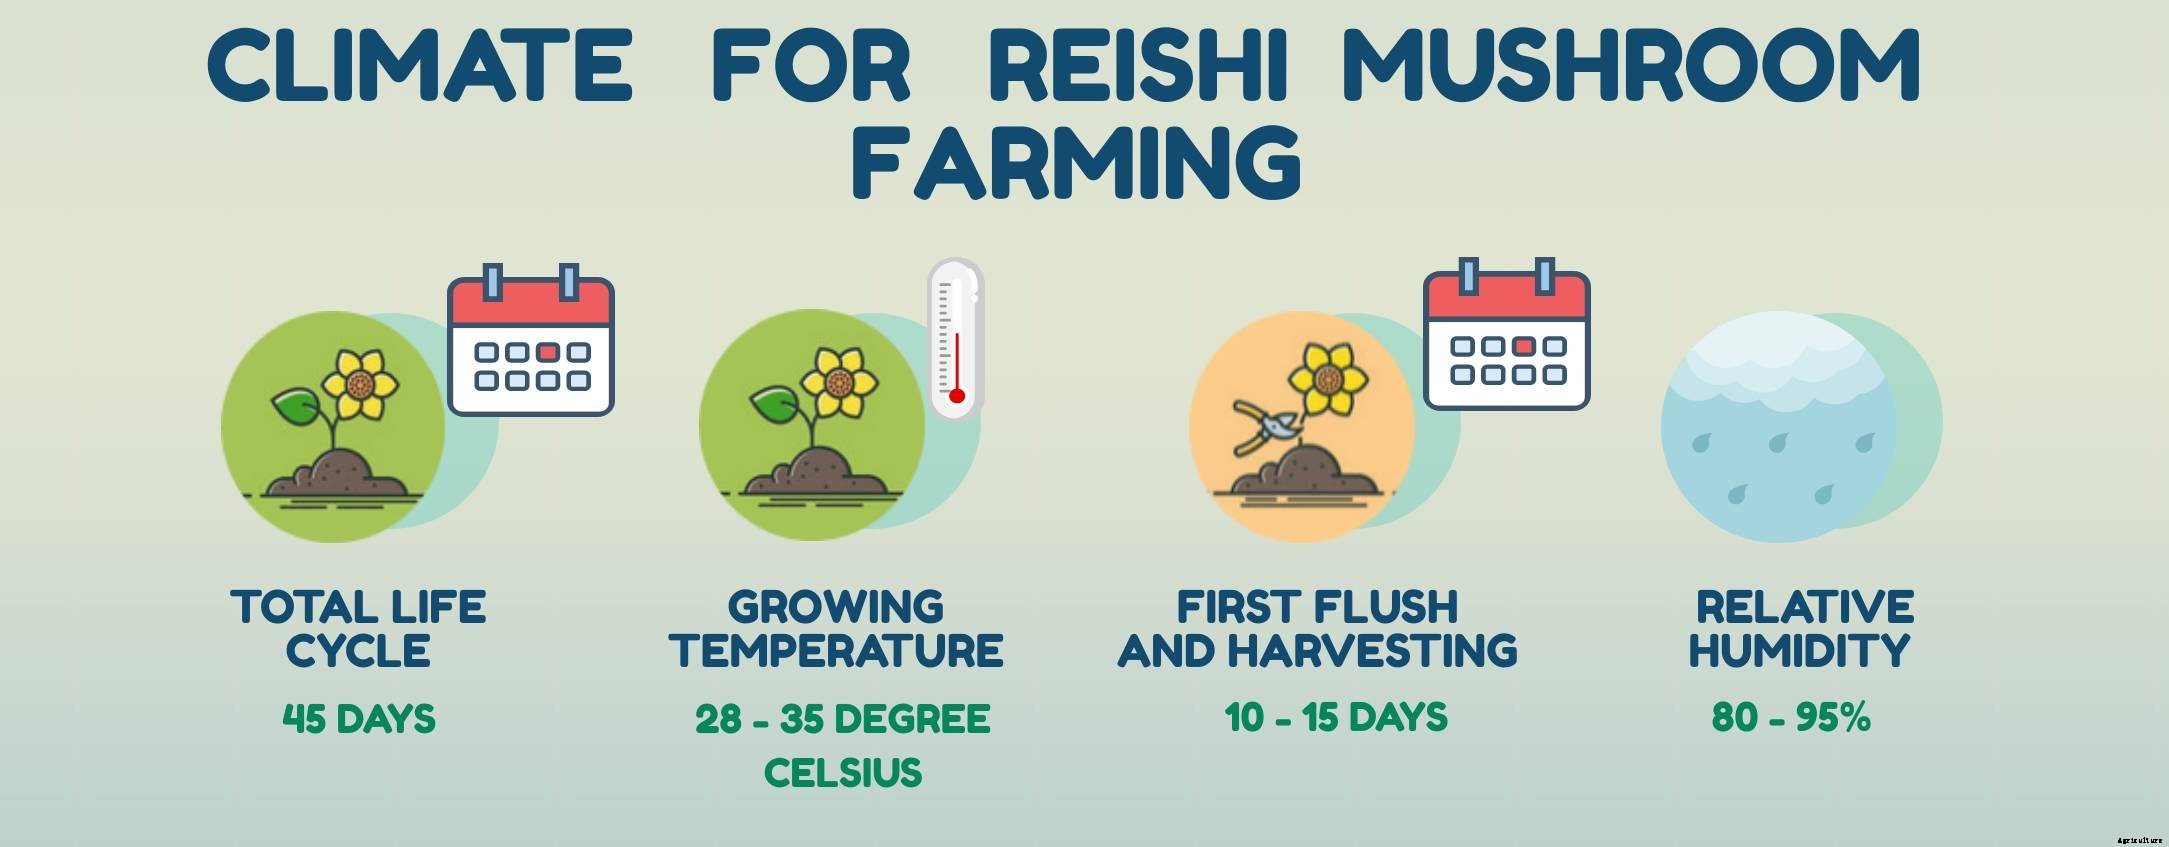
The bags incubated in a closed dark room with temperature of 28 to 35 degree Celsius.
The level of carbon dioxide is kept high in the incubation room.
The bags are kept in a dark room for almost 25 days.
Crop management and fructification of Reishi mushroom
After 25-30 days of incubation, the top part of the Polypropylene bag is cut off at the level of top part of the substrate.
Fruiting and pinning will start happening at this point .
The adequate environmental conditions like temperature of 28 degree Celsius, 800 lux light, 95% relative humidity and 1500 ppm carbon dioxide, are provided to the bags.
Humidity is reduced to 80% once the pins have started growing flatter whitish tops.
Now is the time when fresh air is also introduced to reduce the carbon dioxide levels to 1000 ppm.
When the caps become yellowish in colour, the temperature is lowered further to 25 degrees Celsius along with further reduction in relative humidity to 60%.
Harvesting of Reishi mushroom
Fully matured Reishi mushrooms have a reddish-brown top.
The Reishi mushrooms are harvested by two hands. One hand is used to tightly hold the root and the other hand can be used to pulling the Reishi mushroom out.
Harvest the Reishi mushrooms can also be done with cutting tools but it should be made sure that no residual steam is left on the compost log.
The first flush of Reishi mushrooms can be seen in almost 2 weeks.
After harvesting the first flush, again the environment of the room or polyhouse should be switched back to adequate environment for pinning. (i.e., 28 °C, 95%RH, 1500 ppm CO2, 800 lux light)
250 grams of Reishi mushrooms can be cultivated from 1 kg of substrate on an average.
Mushrooms are washed with water after harvesting.
Na het wassen, Reishi mushrooms must be dried in temperatures lower than 50 degrees Celsius. A temperature of 35 degrees Celsius in drier cabinet is advisable.
Diseases and preventive measures in Mushroom cultivation
Some of the diseases of mushrooms are listed below:
MUSHROOM DISEASES
SYMPTOMS
CONTROL AND PREVENTION
Mushroom flies
These flies are small, delicate, zwart, yellowish or sometimes brown with different types of wing venation and size.
Spring is inside the wall of the mushroom house.
The insecticide should be added in the last turning of the compost.
Mites
They are small in size and are Majorly white, geel, red and brown. They can be found running over the surface of the fruit bodies, mushroom beds and on the floors and walls of the mushroom houses.
The damage the crop by feeding on the spawn to make holes in the mushroom caps and stalks and cause stunting of fruit bodies as well as brown spots on the caps and stems.
Proper pasteurization of compost. Proper hygiene and sanitation.
Disinfection of the mushroom houses by spraying 0.1% dicofol. Burning sulphur in the empty room.
Springtails
They are silver-grey 2 brown colours with a light violet band along the sides of the body and black cellular fields present on the head.
They are the main species that damage mushrooms. They enter mushroom houses along with organic matter.
They feed on mycelium from spawn. They also feed on the gills of the oyster mushroom destroying the lining and spit out the mycelial strands at the base of the stripes.
They also attack the fruiting bodies of button mushrooms and cause slight pitting and browning at feeding sites.
Cleaning surrounding and inside of the mushroom house.
Proper disposal of spent compost. Proper pasteurization of composed and casing material.
Raising the crop above the floor level.
Brown plaster mould
Occurs on the cropping trees, initially cloudy white appearance later changes to brown.
Originally fungus rises in compost. too wet compost, high temp. (28-32) c during spawn run and cropping at more than 18 C encourages Infection.
Maintain suitable temp. during the spawn run and cropping 2% of formalin
Bubble disease:– C.O.:Mycogone perniciosa
Dense white mat of mycelium leading to reduction in yield.
Swollen stalk and smaller cap at early stage. Unpasteurized compost also leads to it. An amber liquid appears on infected mushrooms.
Mushrooms become brown. Bubbles may be as large as a grapefruit. It is also a parasite of wild mushrooms.
It produces two spore types, one which is small and water-dispersed like Verticillium. the second which is a large resting spore capable of persisting for a long time in the environment.
Appearance of brown slightly sunken blotches on the mushroom cap Spots are irregular, yellowish to dark brown.
Main source of infection is infection soil and separate through flies, mites and nematodes.
Casing soil sterilization and proper ventilation . Use of chlorinated water.
Spray of terramycin @ 9mg/f on beds.
Types of Mushrooms
Based on the purpose of this article, we can categorize types of Mushrooms in the following two categories.
Based on Scientific name (Genus, Species and Common name)
GENUS
SPECIES
COMMON NAME
Agaricus
arvensis
Horse Mushroom
Augustus
The prince
bernardii
bisporus
Common store mushroom
brunnescens
button mushroom
commercial mushroom
bitorquis
Spring agaricus
rodmanii
campestris
Field or meadow mushroom
crocodilinus
Crocodile agaricus
fuscofibrillosus
Bleeding agaricus
haemorrhoidarius
Bleeding agaricus
Amanita
phalloides
Death cap
Armillaria
matsutake
Matsutake
mellea
Honey or oak mushroom
ponderosa
American matsutake or pine mushroom,
recently renamed Tricholoma magnivelare
Auricularia
auricula
Cloud ear mushroom or Judas' ear
polytricha
Wood ear mushroom,
tree ear, or black fungus
Boletus
aereus
appendiculatus
Butter bolete
badius
Bay bolete
barrowsii
Barrow's bolete
bicolor
Two-colored bolete
edulis
Porcini, cèpe, or king bolete
mirabilis
Admirable bolete
pinicola
Variant of B. edulis
regius
Regal bolete
zelleri
Zeller's bolete
Bovista
verscheidene
Puffball
Calbovista
verscheidene
Puffball
Calvatia
gigantea
Puffball
Cantharellus
cibarius
Golden chanterelle or egg mushroom
cinnabarinus
Cinnabar-red chanterelle
lateritius
Smooth chanterelle
subalbidus
White chanterelle
tubaeformis
Trumpet chanterelle
Chlorophyllum
molybdites
Green-spored parasol mushroom
morgani
Clitocybe
fragrans
Fragrant clitocybe
odora
Anise-scented
nuda
Blewit
Clitopilus
prunulus
Sweetbread mushroom
Coprinus
atramentarius
Alcohol inky cap
comatus
Shaggy mane, lawyer's wig, or inky cap
micaceus
Mica cap
Cortinarius
armillatus
Bracelet cortinarius
Craterellus
cornucopioides
Horn of plenty, trumpet of death,
or black chanterelle
Entoloma
abortivum
Aborted entoloma
Flammulina
velutipes
Enoki, velvet foot, golden needle,
or winter mushroom
Gomphus
clavatus
Pig's ear
Grifola
frondosa
Hen of the woods
Polypilus
Gyromitra
gigas
Snowbank false morel
Helvella
lacunosa
Black saddle mushroom
Hericium
coralloides
Coral hericium
caput ursi
americanum
erinaceus
Bear's head, monkey head, or pom-pom
ramosum
Comb tooth mushroom
Hydnum
repandum
Hedgehog mushroom or sweet tooth
umbilicatum
Belly-button mushroom
Hygrophorus
russula
Russula like waxy cap
Lactarius
deliciosus
Delicious milky cap
fragilis
Candy cap
indigo
Blue milky cap
rubrilacteus
Bleeding milky cap
Leccinum
aurantiacum
Orange-capped scaber stalk
insigne
Aspen scaber stalk
manzanitae
Manzanita scaber stalk
scaber
Scaber stalk
Lentinus
edodes
Shiitake, black forest mushroom
Lepiota
molybdites
Green-spored parasol
Chlorophyllum
Lepiota
procera
Parasol mushroom
rhacodes
Shaggy parasol mushroom
or drumstick mushroom
Lepista
nuda
Blewit
Clitocybe
Lycoperdon
verscheidene
Puffball
Marasmius
oreades
Fairy-ring mushroom
scorodonius
Garlic marasmius
Morchella
angusticeps
Morel or sponge
conica
Morel or sponge
deliciosa
Morel or sponge
esculenta
Morel or sponge
Phlogiotis
helvelloides
Apricot jelly mushroom
Pholiota
nameko
Nameko
aurivella
Butter mushroom
Pleurocybella
porrigens
Angels' wings
Pleurotus
ostreatus
Oyster mushroom
sajor-caju
Oyster mushroom
Pluteus
cervinus
Fawn mushroom
Polypilus
frondosa
Hen of the woods
Grifola
Polyozellus
multiplex
Clustered blue chanterelle
Polyporus
umbellatus
Umbrella polypore
Ramaria
botrytis
Red-tipped coral mushroom
Rozites
caperata
Gypsy mushroom or chicken of the woods
Russula
aeruginea
Tacky green russula
cyanoxantha
Charcoal burner
delica
Short-stem russula
nigricans
Blackening russula
vesca
Bare-toothed russula
xerampelina
Shellfish-scented russula
Sparassis
crispa
Cauliflower mushroom
radicata
Strobilomyces
confusus
Old man of the woods
floccopus
Stropharia
rugosoannulata
Wine-cap stropharia
Suillus
brevipes
Short-stalked slippery cap
granulatus
Dotted-stalk suillus
pictus
Painted suillus
Terfezia
bouderi
Black kame
claveryi
Brown kame
Tremella
fuciformis
Snow mushroom, white jelly fungus,
or silver ear mushroom
Tricholoma
flavovirens
Man on horseback
equestre
magnivelare
Pine mushroom or American matsutake
Tuber
aestivum
Summer truffle
gibbosum
Oregon white truffle
magnatum
Italian white truffle
melanosporum
French black truffle
texensis
Texas white truffle
Volvariella
volvacea
Straw mushroom or paddy straw mushroom
Based on local Indian Mushroom variety (Cultivated in India for edible and medicinal purposes)
Agaricus Bisporus
Pleurotus Sajor-caju
Volcvariella Volvacea
Calocybe Indica
Pleurotus Ostreatus
Auricularia Spp.
Pleurotus Florida
Lentinula Edodes
Pleurotus Djamor
Ganoderma Lucidum
Pleurotus Eryngii
Hypsizygus Tessulatus
laatste woorden
Mushroom farming in India has seen a considerable growth worldwide. Its not only being farmed for dietary consumption but also for medicinal purposes. One of the most attractive aspect of doing mushroom farming is, its still very lucrative even if done in a small scale.
Mushroom farming in India presents itself as a very good business idea for not only budding entrepreneurs / farmers but also veterans of agriculture.
Ik hoop dat dit artikel veel van uw vragen heeft kunnen beantwoorden. Aarzel niet om uw gedachten te becommentariëren. Elke suggestie of advies wordt zeer op prijs gesteld. Ook, plaats alstublieft alle vragen die nog onbeantwoord zijn. Ik zou graag helpen. Please feel free to share the article with anyone who you think is in need of assistance in gaining information on mushroom farming / mushroom cultivation.